选择器 Selectors #
*:通配符选择器element:选择所有指定类型的元素.class:选择所有具有该类的元素#id:选择具有该ID的元素
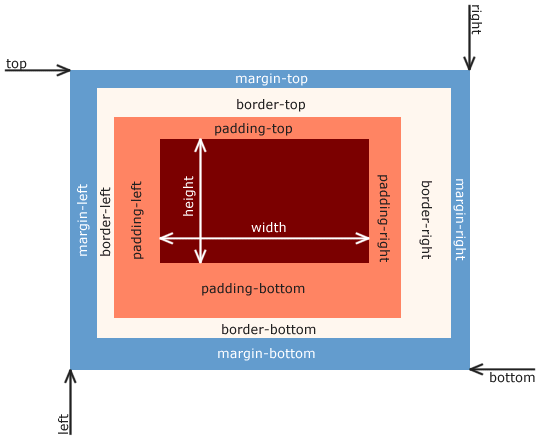
盒模型 Box Model #

margin:控制元素外部的空间,margin-left/right/top/bottomborder:元素的边框,border-widthpadding:控制元素内部的空间,padding-left/right/top/bottomwidth/height:设置元素的宽度和高度
文档流 Normal Flow #
在HTML和CSS中,文档流(也称为正常流或普通流)是指页面上元素的默认布局规则。
块级元素(Block-level elements):在文档流中自上而下地垂直排列。默认情况下,块级元素会占据其父容器的完整宽度,无论其内容实际大小如何,块级元素高度由其内容决定。常见的块级元素有:
<div>,<p>,<h1>,<form>, 等等。行内元素(Inline elements):在文档流中从左到右水平排列,直到行满为止,然后换到下一行继续。行内元素只占据其内容的宽度,不会独占一行。常见的行内元素有:
<span>, <a>, <img>, <strong>, <em>,等等。
定位 Positioning #
position: static | relative | absolute | fixed | sticky;- top | right | bottom | left: Position adjustments,相对原有位置的正向偏移,不会改变元素本身的尺寸,不会影响其他元素的布局。
2个结合使用
<style>
  .relative-box {
    position: relative;
    top: 10px; /* 向下移动10像素 */
    left: 20px; /* 向右移动20像素 */
    width: 100px;
    height: 100px;
    background-color: lightblue;
  }
</style>

<div class="relative-box">这是相对定位的元素</div>
几种定位方式:
- Static(静态定位):默认,元素按照正常的文档流进行排列
- Relative(相对定位):元素首先按照正常文档流定位,然后相对于其正常位置进行偏移。适用于调整文本标签的位置,或在布局中轻微移动一个图片
- Absolute(绝对定位):元素从正常文档流中脱离,不占据空间,其他元素会表现得如同这个绝对定位的元素不存在,相对于最近的已定位(非static)祖先元素进行定位。适用于弹出菜单、悬浮卡片
- Fixed(固定定位):元素从正常文档流中脱离,并相对于浏览器窗口进行定位,即使页面滚动,元素也会停留在设定位置。适用于需要常驻屏幕特定位置的元素,如固定顶部的导航栏或固定底部的聊天按钮
- Sticky(粘性定位):相对定位和固定定位的结合。元素根据正常文档流定位,但当页面滚动到达某个阈值时,它会像固定定位一样固定在指定位置。适用于在用户滚动页面时看到的粘性表头(表格的标题行)或粘性侧边栏
假设一个父元素被设置为 position: relative;(非static),它内部有一个子元素设置为 position: absolute; top: 20px; left: 20px;。这个子元素会从父元素的上边和左边内边距向下和向右各偏移20像素的位置开始定位,而不是根据整个页面或其他元素的位置
弹性盒模型 Flexbox #
Flexbox 是一种强大的布局工具,旨在提供更灵活的方式来对齐和分布容器内的项目,在 Flexbox引入之前,CSS的布局方法主要依靠浮动(float)和定位(position)来实现复杂的布局设计
display: flex;表明这个元素是一个Flex容器,其直接子元素将成为Flex项目,这些子元素将按照Flexbox模型布局
Flex容器会像其他块级或行内元素一样影响和被周围的元素影响。例如,一个块级Flex容器(display: flex)会在页面上占据一个新的行,而一个行内Flex容器(display: inline-flex)则会在行内显示,与文字和其他行内元素一起流动。
但容器内部的元素,即Flex项目则不再按传统文档流布局。这些Flex项目的布局完全受Flexbox模型的控制
flex-direction这个属性定义了Flex容器中项目的主轴方向
- row:项目水平排列,从左到右(默认值)
- row-reverse:项目水平排列,但是从右到左
- column:项目垂直排列,从上到下
- column-reverse:项目垂直排列,但是从下到上
justify-content这个属性定义了项目在主轴上的对齐方式
- flex-start:项目靠近主轴的起点排列
- flex-end:项目靠近主轴的终点排列
- center:项目在主轴中心对齐
- space-between:项目之间的间隔相等,首个项目贴近起点,末尾项目贴近终点
- space-around:项目之间的间隔相等,但每个项目两侧的间隔是其间隔的一半
align-items这个属性定义了项目在交叉轴上如何对齐
- stretch:如果项目未设置高度或设为auto,将占满整个容器的交叉轴方向(这是默认值)
- flex-start:项目在交叉轴的起点对齐
- flex-end:项目在交叉轴的终点对齐
- center:项目在交叉轴的中心对齐
- baseline:项目在交叉轴上基线对齐,即项目的文本基线对齐,通过基线对齐,即使这些项目的外部高度不同,它们的文本也可以保持一致的视觉基线
在排版中,基线是指文本行内字符底部的一条虚拟线。大多数字母和字符(例如小写的 ‘a’、’e’、’m’ 等)都坐落在这条线上
<style>
.container {
  display: flex;
  justify-content: space-around;
  align-items: center;
  height: 200px;
  background: lightblue;
}
.item {
  width: 50px;
  height: 50px;
  background: coral;
  text-align: center;
  line-height: 50px;
}
</style>

<div class="container">
  <div class="item">1</div>
  <div class="item">2</div>
  <div class="item">3</div>
</div>
在这个例子中,.container 是Flex容器,它定义了其子元素 .item(Flex项目)的布局方式。项目按照容器的指令在容器内部水平分布,并在交叉轴上居中对齐
网格 Grid #
display: grid;:启用网格布局
grid-template-columns / grid-template-rows:定义列/行的大小
grid-gap:网格单元之间的间隙
<style>
  .grid-container {
    display: grid;
    grid-template-columns: repeat(3, 1fr); <!-- 设置三列,每列宽度等于容器宽度的三分之一 1fr = 1 fraction 1等分-->
    gap: 10px;
    width: 100%;
    padding: 10px;
  }
  .grid-item {
    background-color: lightblue;
    padding: 20px;
    text-align: center;
  }
</style>

<div class="grid-container">
  <div class="grid-item">Item 1</div>
  <div class="grid-item">Item 2</div>
  <div class="grid-item">Item 3</div>
  <div class="grid-item">Item 4</div>
  <div class="grid-item">Item 5</div>
  <div class="grid-item">Item 6</div>
</div>
排版 Typography #
font-family: Typeface of the text,文字字体
font-size: Size of the text,文字大小
font-weight: Weight of the font (normal, bold),文字粗细
text-align: center | left | right | justify; Alignment of the text,文字对齐方式
line-height: Space between lines of text,行间距
color: Color of the text,文字颜色
背景 Backgrounds #
background-color: Color of the background,背景颜色
background-image: Image to use as a background,背景图片
background-repeat: no-repeat | repeat-x | repeat-y | repeat; Control background image repetition,背景重复方式
background-position: Positioning of the background image,背景图片位置
过度 & 动画 Transitions & Animations #
transition: Smoothly animates CSS properties,过渡
<style>
  .button {
    background-color: #4CAF50; /* 初始背景色 */
    color: white;
    padding: 10px 20px;
    font-size: 16px;
    border: none;
    cursor: pointer;
    transition: background-color 0.5s ease; /* 过渡效果设置 */
  }

  .button:hover {
    background-color: #3e8e41; /* 鼠标悬停时的背景色 */
  }
</style>

<button class="button">Hover over me!</button>
animation: Defines the animation,动画
<!DOCTYPE html>
<html lang="en">
<head>
    <meta charset="UTF-8">
    <title>CSS Animation Example</title>
    <style>
        .spinner {
            width: 100px;
            height: 100px;
            background-color: #4CAF50;
            animation: spin 2s linear infinite;
        }

        @keyframes spin {
            from { /* 0% */
                transform: rotate(0deg);
            }
            to { /* 100% */
                transform: rotate(360deg);
            }
        }
    </style>
</head>
<body>
    <div class="spinner"></div>
</body>
</html>
媒体查询 Media Queries #
@media (max-width: 600px) { ... }: CSS rules for specific conditions,触发特定条件CSS规则
媒体查询结合Flex实现基于视窗宽度的响应式布局
<!DOCTYPE html>
<html lang="en">
<head>
    <meta charset="UTF-8">
    <meta name="viewport" content="width=device-width, initial-scale=1.0">
    <title>Responsive Design with Flexbox</title>
    <style>
        body {
            font-family: Arial, sans-serif;
            margin: 0;
            padding: 0;
        }

        .container {
            display: flex;
            flex-direction: column; /* 默认情况下,元素堆叠在垂直方向 */
            min-height: 100vh; /* 视窗的完整高度 */
        }

        .sidebar {
            background: #f4f4f4;
            padding: 20px;
            order: 2; /* 默认时,sidebar在下方 */
        }

        .main {
            background: #ddd;
            padding: 20px;
            order: 1; /* 默认时,main内容在上方 */
            flex: 1; /* 占用剩余空间 */
        }

        @media (min-width: 600px) {
            .container {
                flex-direction: row; /* 屏幕宽度大于600px时变为水平方向 */
            }

            .sidebar {
                width: 25%; /* 侧边栏占据25%宽度 */
                order: 1; /* 恢复正常顺序,sidebar在左侧 */
            }

            .main {
                width: 75%; /* 主内容区占据剩余75%宽度 */
                order: 2; /* main在右侧 */
            }
        }
    </style>
</head>
<body>
    <div class="container">
        <div class="sidebar">
            <h3>Sidebar</h3>
            <p>This is the sidebar area.</p>
        </div>
        <div class="main">
            <h1>Main Content</h1>
            <p>This is the main content area.</p>
        </div>
    </div>
</body>
</html>
伪类与伪元素 Pseudo-Classes & Elements #
伪类
:hover:当鼠标悬停在元素上时的样式
:focus:元素获得焦点时的样式,焦点可以通过点击、使用Tab键在表单元素之间导航,或其他编程方式获得
<style>
  a:link { color: blue; }      /* 未访问的链接 */
  a:visited { color: purple; } /* 已访问的链接 */
  a:hover { color: red; }      /* 鼠标悬停在链接上时 */
  a:active { color: yellow; }  /* 链接被点击时 */
</style>

<a href="#">Hover over me!</a>
伪元素
::before, ::after:在元素内容前后添加样式
<style>
  .decorated {
    position: relative;
    padding: 10px;
    background: lightblue;
  }

  .decorated::before {
    content: "【";
    color: red;
  }

  .decorated::after {
    content: "】";
    color: red;
  }
</style>

<div class="decorated">This text is decorated.</div>